
Yes, you can try Phototactic before you buy it. This free lesson teaches you to see the street as simple shapes and to compose with one of the 8 arrangement principles, repetition, and it ends with an exercise you can start today.
I'm Olivier Duong, co-author of Phototactic with Don Springer. This page is a sample drawn from the Phototactic method, written from my published teaching on Inspired Eye. It is not a transcript of a course video. The course itself is short videos, and it comes with a 60 day money back guarantee.
What a picture pattern is in street photography
A picture pattern is a visual arrangement your brain can recognize in a split second, the way you recognize a word without spelling it out. You don't think about reading. You look at the letters and you read. Street photography works the same way once the patterns are in your head. Once a pattern sticks, you know it when you see it.
Street photography is a form of photography where you can't arrange the scene. Good street photography looks arranged anyway. Picture patterns are what separate a street photographer who gets lucky from one who knows what to look for.
Going out to shoot is the best way to develop your photographer's eye, but only if you know what to look for. Shooting with no pattern in mind is like reading a book in a foreign language with no vocabulary. It's frustrating, and putting more hours into it doesn't help much. Picture patterns stay invisible until someone points them out.
I learned this the slow way. I trained as a graphic designer, and I only started to improve as a photographer when I learned my patterns as a designer by day and used them later when I walked the city. On a visual level, street photography is graphic design: bringing visual order to the chaos of the streets.
Phototactic teaches each pattern in two stages:
- Exposure. You see the pattern, explained with pictures. Your mind has a bias for images, so this is often enough for it to stick.
- Reinforcement. You look for that pattern in your own life, ideally with a camera in hand. If exposure puts the nail in the wood, reinforcement hammers it down.
This lesson follows the same two stages. Read it once, then do the exercise at the end.
Step 1: learn to see in shapes, the base of composition in street photography
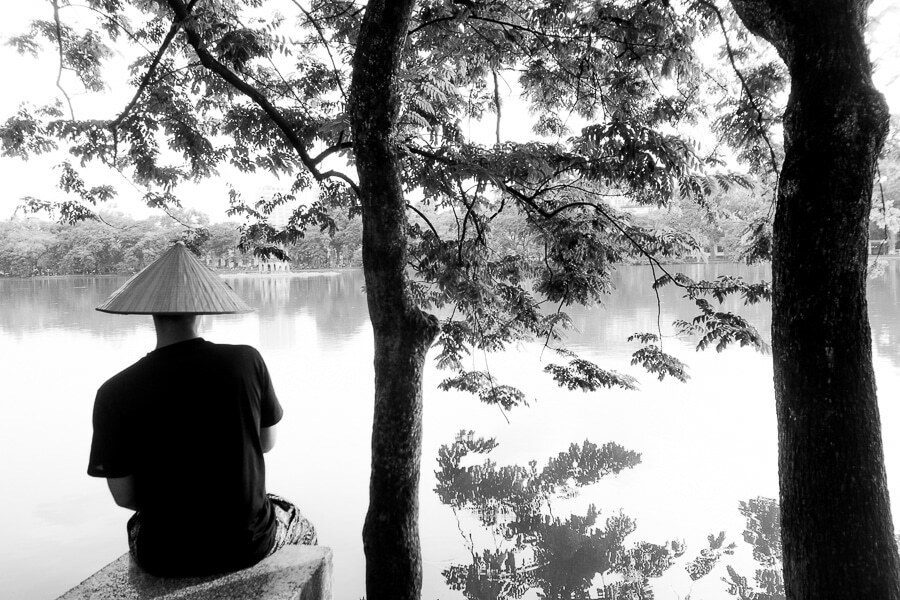
The world looks complex, but it is built from simple parts. Everything you see can be reduced to basic visual elements, and shapes are one of them. The course covers 6 elements in all. Shapes are the easiest place to start.
The shapes in a scene are the skeleton of your image. Like the foundation of a house, they decide the overall look of the picture before you even get to the subject. Painters have a head start here. When Don and I coached street shooters years ago, the one painter in the group was ahead of the rest because painters already see the world as simple visual elements.
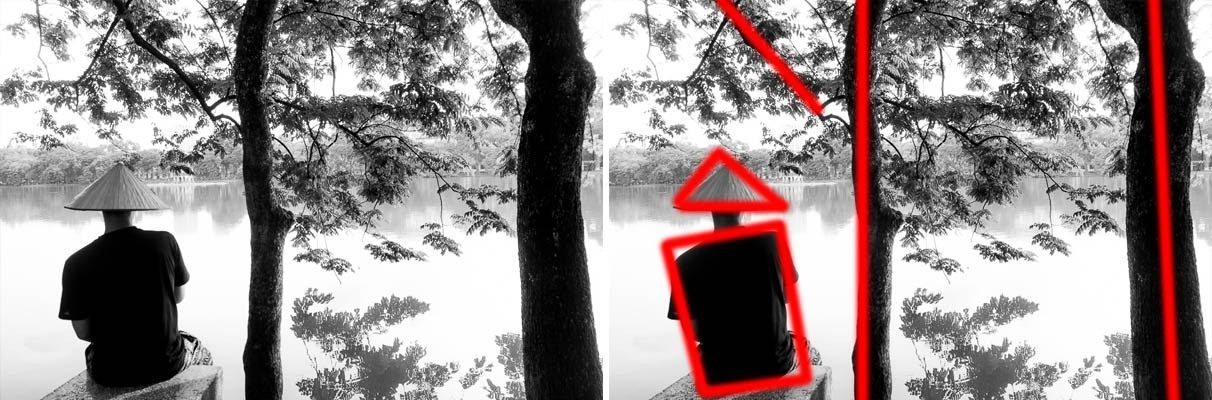
In the photo above, the hat is a triangle sitting on a dark block, and two strong verticals frame it. Remove the details and the picture still holds together. That is how you know the composition works.
Shapes also carry meaning. A triangle points and feels active. A tall vertical feels stable and upright. Your camera is your paintbrush, so pick shapes that fit the feeling you want.
Step 2: the principle of repetition every street photographer should know
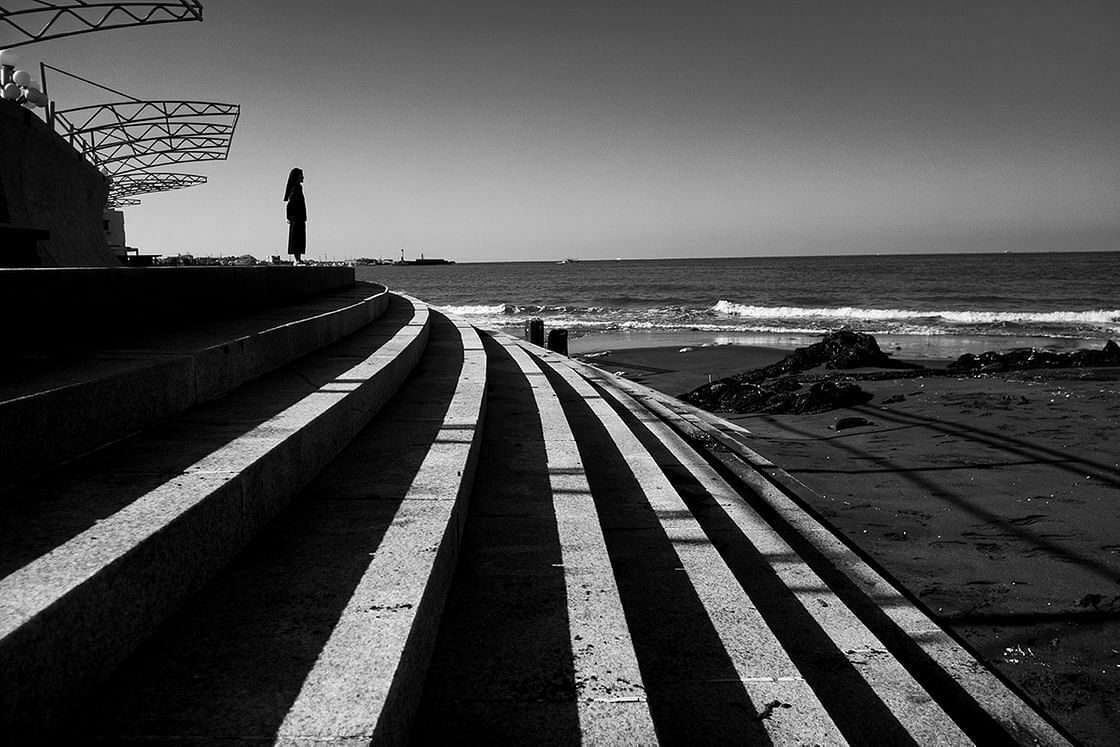
Once you see shapes, the easiest way to compose is to repeat them. Repetition is one of the 8 arrangement principles in Phototactic, and it is the easiest of the street photography techniques to learn.
Have you ever been walking down the street and seen a couple wearing matching clothes? Your brain went "zing" and linked the two people. That is the law of similarity at work: we group like with like. When you repeat elements in a picture, the viewer feels the same zing, and the frame looks designed instead of random.
You can repeat an element twice, or many times. Here are good places to find repetition on the street:
- Architecture. Windows, columns, railings, steps and tiles repeat by design.
- Shadows. A shadow repeats the shape of the person who casts it. Hard light makes this easy. My guide to light and shadow photography covers where to find it.
- Reflections. A reflection repeats part of the scene, which is why reflections look graphic almost by default.
- People. Matching hats, the same gesture, a row of commuters with the same pose. Even street portraits can use it, with a face framed by repeated windows.
- Signs and posters. A figure on a billboard that echoes a real person below it.
Henri Cartier-Bresson’s Behind the Gare Saint-Lazare (1932) is a famous example of the decisive moment, and of repetition. The leaping man is echoed by his own reflection in the puddle and by a leaping figure on a poster behind him. The Fondation Henri Cartier-Bresson looks after his work.
All the photos on this page are black-and-white. Removing color makes shapes and repetition easier to see, which is why black-and-white photos are a good way to train your eye.
Repetition plus contrast
Repetition gets stronger when something breaks it. In the steps photo, the stripes repeat and lead the eye, and the one small figure at the top becomes the point everything arrives at. Contrast is the most powerful visual principle there is. It is the energy between two extremes, like many and one, or light and dark. Painters call the play of light and dark chiaroscuro. A row of the same thing with one odd element in it is repetition and contrast working together.
Keep emotion first, though. A strong frame is only a container. The best repetition pictures still have an interesting subject, like a gesture or a candid moment worth looking at. Repetition is a tool. Your personal vision decides what to point it at. My guide to what makes a good photograph covers the other half.
Exercise: a 10 day repetition quest on your photo walks
This is the reinforcement stage. The goal is to make repetition something you notice without trying, so you immerse yourself in one pattern for 10 days. Your images are right in front of your nose. It's like a radio: every station plays at the same time, but you only hear the one you tune in. This exercise tunes you in.
- Day 1 to 3, no camera needed. Every time you notice two or more things that repeat, name them in your head: "three windows", "two red coats", "a man and his shadow". Aim for 20 a day.
- Day 4 to 6, shapes only. Take your camera or phone. Photograph repetition with no people in it. Try a busy street corner, a parking garage, a market or any urban landscape. Fill the frame with the repeated shapes and keep it simple, then move on to the next shot.
- Day 7 to 9, add a person. Keep your camera on you on every photo walk. Find a repeated pattern and wait for someone to enter it. This is candid street photography: people in public going about their day, and you take the photo when they become part of the pattern. This is the "trap shot": the background is set, you only wait for the subject. Use zone focusing so you can shoot the moment they hit the right spot. My street photography settings guide explains how.
- Day 10, review. Pick your best five frames. For each one, ask: what repeats? What breaks the repetition? Where does my eye land first? Would the picture still hold if I reduced it to shapes? This is how you take better pictures on purpose instead of hoping for great photos.
Shoot where you live. You don't need an exciting city for this. Repetition is everywhere, in car parks and supermarkets as much as in Tokyo. If photographing people makes you nervous, this builds confidence: shooting the pattern first and letting people walk into it is a gentle way in. When you want to photograph strangers up close, read how to photograph strangers. My guide on how to overcome the fear of street photography goes further.
Technical settings for the exercise
Keep the technical settings simple so your attention stays on the pattern. This lesson works with any camera for street photography, from a phone to a Fuji or a Leica. There's no camera to choose before you start.
- Aperture. f/8 gives you enough depth of field to keep the pattern and the person sharp.
- Shutter speed. 1/250s or faster freezes people walking into your frame.
- ISO. Use auto-ISO with a maximum around 6400, so the camera handles changing light.
- Focus. Zone focus at 2 to 3 meters, or use your normal autofocus if that feels easier.
If you prefer manual mode, that works too. Any focal length works. Wider lenses fit more repetition into the frame, and longer ones stack it. Try different angles: shoot down on steps, up at windows, along a row of railings or straight at a wall of tiles. The street photography settings guide has more detail, and leading lines pair well with repetition.
Why street photography tips on YouTube don't teach picture patterns
One question comes up again and again on Reddit: "The biggest question I have is, what I cannot learn from YouTube/the internet?" It's a fair question. Free street photography tips are everywhere, and many are good. But nobody learns the art of street photography from a pile of tips.
The problem is order. Most free learning is a pile of separate tips: get closer, use good light, try this lens, shoot every day. You pick up pieces, but nobody tells you which patterns matter most or how they fit together. That is where the frustration comes from. You keep shooting, you take a photo you like now and then, and you can't say why it worked.
A structured method gives each pattern a place. You learn the elements first, then the laws and principles that arrange them. Emotion and intent come after that. That is also why studying iconic photographers and documentary photographers pays off once you know the patterns. When you look at the history of the genre, from Cartier-Bresson to Joel Meyerowitz and Steve McCurry, you start to see the repetition and contrast inside their frames instead of just liking the pictures.
Workshops and a photography class give you something else: someone who looks at your photos. Phototactic doesn't do that. If you want to learn more about street photography courses and what each one includes, see the best street photography courses.
What the full course adds
This lesson covers one element and one principle. The full online street photography course teaches all 8 arrangement principles in its composition module, along with the 5 laws and the 6 elements. Other modules cover intent, emotion, priming the mind, fear and editing. Each module has a cheat sheet you can keep on your phone.
The lessons are short videos of 3 to 5 minutes. You can stream them or download them and watch at your own pace. The bonuses include a recorded shooting demonstration, a camera basics course, critiques of 10 winning images and a two hour interview with Don Springer about Garry Winogrand and Minor White.
What it doesn't include: nobody reviews your own photos, and there is no community or live teaching. You work through the material on your own. One student, Ferdi Norten, wrote: "It is the first course that gave me a complete workflow to express myself with photos." If you need feedback on your pictures, a workshop or mentor is a better fit. My Phototactic review lists every module and every downside.
The course costs $297 as one payment, and it has a 60 day money back guarantee. The price and guarantee page has the exact terms. If you're still deciding whether any course is worth paying for, read is a street photography course worth it first.
Frequently Asked Questions
Can I try Phototactic before buying?
Yes. This free lesson is a sample drawn from the Phototactic method. It teaches the principle of repetition and gives you a 10 day exercise. The course also has a 60 day money back guarantee, so if you buy it and it doesn't work for you, you can contact us within 60 days for your money back.
Is this lesson a video from the course?
No. It's a written sample built from Olivier Duong's published teaching on Inspired Eye, using the same method as the course. The course itself is a set of short videos of 3 to 5 minutes each, with a cheat sheet for every module and a set of bonus videos.
What is the principle of repetition in photography?
Repetition means repeating a shape, color, line or subject inside the frame. The viewer's brain links similar things together, so repeated elements make a picture feel designed. It gets stronger when one element breaks the pattern, like a single person at the end of a row of repeated steps.
Do I need a special camera for this lesson?
No. Any camera works, including a phone. The exercise is about seeing, not gear. A small camera with zone focusing helps for the trap shots on days 7 to 9, because you can fire the moment someone steps into the pattern without waiting for autofocus.
Will someone review the photos I take for the exercise?
No. Neither this lesson nor the course includes feedback on your own photos. Use the review questions on day 10 to judge your own frames, starting with what repeats and what breaks the repetition. If you want outside feedback, a local camera club or a workshop can give it.