
Leading lines are lines in the scene, like roads or shadows, that pull the viewer's eye toward the subject of a photograph. To use leading lines, find the line first, then place yourself so it points at your subject, or wait for a person to step in where it ends.
I'm Olivier Duong. Before photography I was a graphic designer, and designers are trained to lead the eye on purpose. Leading lines in photography are the easiest way to do that with a camera. They fix the most common complaint I hear about weak photos: there is no focal point, so the eye wanders and leaves.
What are leading lines in photography?
A leading line is a compositional tool: any line in a photograph that the eye follows. Leading lines are used to move the eye through a photograph and hold the viewer's attention on the subject. The line can be real, like a curb or the edge of a building. It can also be implied, like the direction someone is looking.
The eye cannot help following a line. Gestalt psychologists call this the law of continuity: the brain prefers to see a smooth, continuous path, so it keeps traveling along it. If the line ends at your main subject, the viewer lands on the subject without thinking about it.
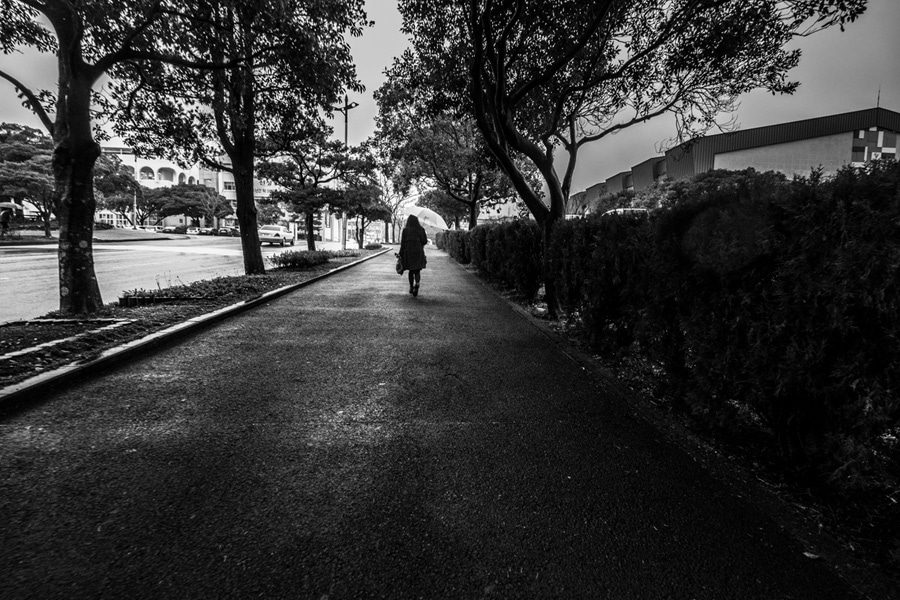
This matters more in street photography than almost anywhere else. With a wide lens and a small aperture, everything is sharp. You cannot blur the background away to isolate someone. Bokeh is the simplest way to lead the eye, but when you cannot use it, lines do the job.
Leading lines also add depth. Lines that converge toward a vanishing point change the perspective and turn a flat, two-dimensional image into a space you can walk into. That is why the use of leading lines adds depth that no filter can fake, and why some of the strongest images in landscape photos and street photos alike are built on a single road.
Types of leading lines: which type of leading line to use
Every line pulls the eye, but each type of leading line gives a photograph a different feeling. Lines can create calm, tension, depth and movement, and lines often do more than one job at once.
Straight lines
Roads and rails. A strong leading line that runs straight from the foreground to the background is the classic example. It is direct and easy to read.
Horizontal lines
Horizontal lines, like the horizon or a row of windows, lead the eye sideways. They convey a sense of stability and calm. Use them to move the viewer across the frame toward a subject on one side.
Vertical lines
Vertical leading lines feel strong and upright: lampposts and the edges of tall buildings. In architecture and city scenes they lead the eye up. Several vertical lines in a row also build rhythm.
Diagonal lines
Diagonal lines add energy and a sense of motion. A diagonal that starts in a corner of the frame is one of the strongest ways into a picture. Shoot a road or a crosswalk from an angle instead of straight on and it turns diagonal.
Curved lines and S-curves
Curved lines slow the eye down and make it wander in a sense of flow. A winding road or a spiral staircase both work. An S-curve pulls the eye deep into the frame while keeping the path interesting.
Converging lines
Two or more lines that converge toward one point create a vanishing point. Put your subject at or near that point and it becomes the target of the whole frame. Lines converge most dramatically with a wide-angle lens.
Implied lines
Nobody draws them, but the eye follows them anyway. A gaze or a pointing hand. The viewer's gaze follows the subject's gaze. If someone in your photo looks at something, we look too.
Lines made of repeated shapes
A row of shadows or a set of windows. The law of similarity makes the brain join similar shapes into one line, even when there are gaps between them.
25 examples of leading lines to look for
These are examples of leading lines you can find on almost any street. Keep the list on your phone and go looking for one type per walk.
- Road markings and the center line of a street
- Crosswalk stripes
- Curbs and the edge of a sidewalk
- Tram and train rails
- Railings along stairs
- Spiral staircases seen from above or below
- Escalators
- Subway platforms and tunnels
- Bridges and the cables that hold them
- A fence or a row of bollards
- Rows of parked cars
- Rows of street trees
- Tree lines along a park path
- Building edges seen from a low angle
- Windows and balconies repeated along a facade
- Arcades and columns
- Hallways and alleyways
- Long shadows at the start or end of the day
- Shafts of light between buildings
- Power lines and overhead wires
- A queue of people
- Market stalls in a row
- Shoreline, riverbank or harbor wall
- A person's gaze or pointing arm
- The direction a crowd is walking
Landscape photographers use many of the same lines: rivers, fences, trails and tree lines. The difference on the street is that the line is usually waiting for a person to finish it.
How to use leading lines in photography on the street
Leading lines are a simple technique, but it takes practice to learn how to use them on moving people. Here is how I use lines to guide the eye when I shoot.
1. Find the line, then wait for the subject
Most of my line shots start with an empty stage. I see a strong line, frame the shot and wait for someone to walk to the spot where the line ends. The composition is already done. The person completes it. This is the easiest way to incorporate the leading lines into your composition, because you are not trying to see the line and catch the moment at the same time.
2. Make the lines point toward your subject
A line pulls the eye somewhere. Make sure that somewhere is your subject. A line that runs out of the corner of the frame takes the viewer with it. When another leading line crosses the first, check that both end in the same place, or the overall composition splits in two.
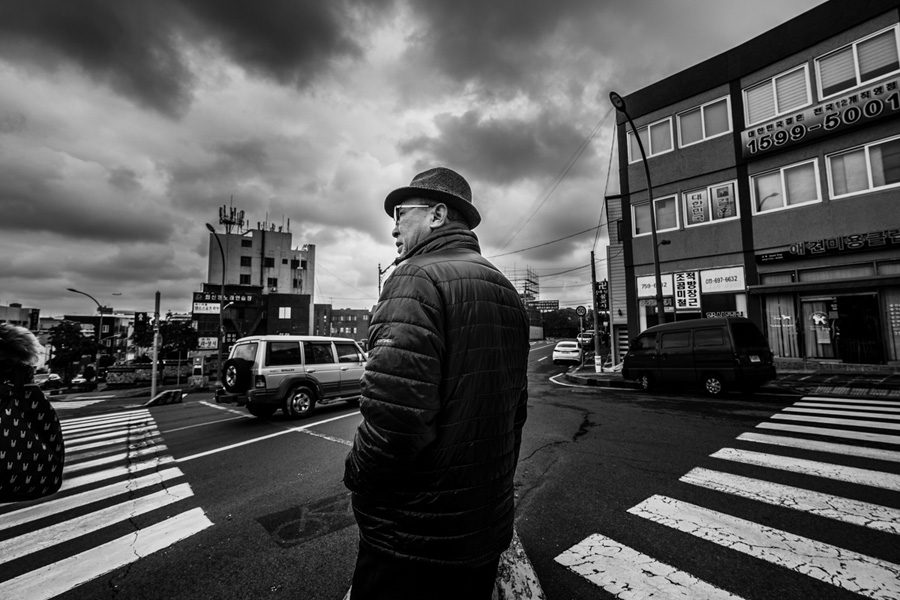
3. Put lines on the edges with a wide-angle lens
One thing I usually do is put leading lines like roads on the edges of the frame, especially at wide angles. Things stretch near the edges of a wide-angle lens, so the lines get longer and pull you into the frame. With a very wide lens, strong converging lines around a central subject work really well. My best lens for street photography guide covers the focal lengths.
4. Get low or change your angle
Crouch and the road in front of you fills the bottom of the frame. Step to one side and a straight line becomes a diagonal. Small changes in position change how lines point.
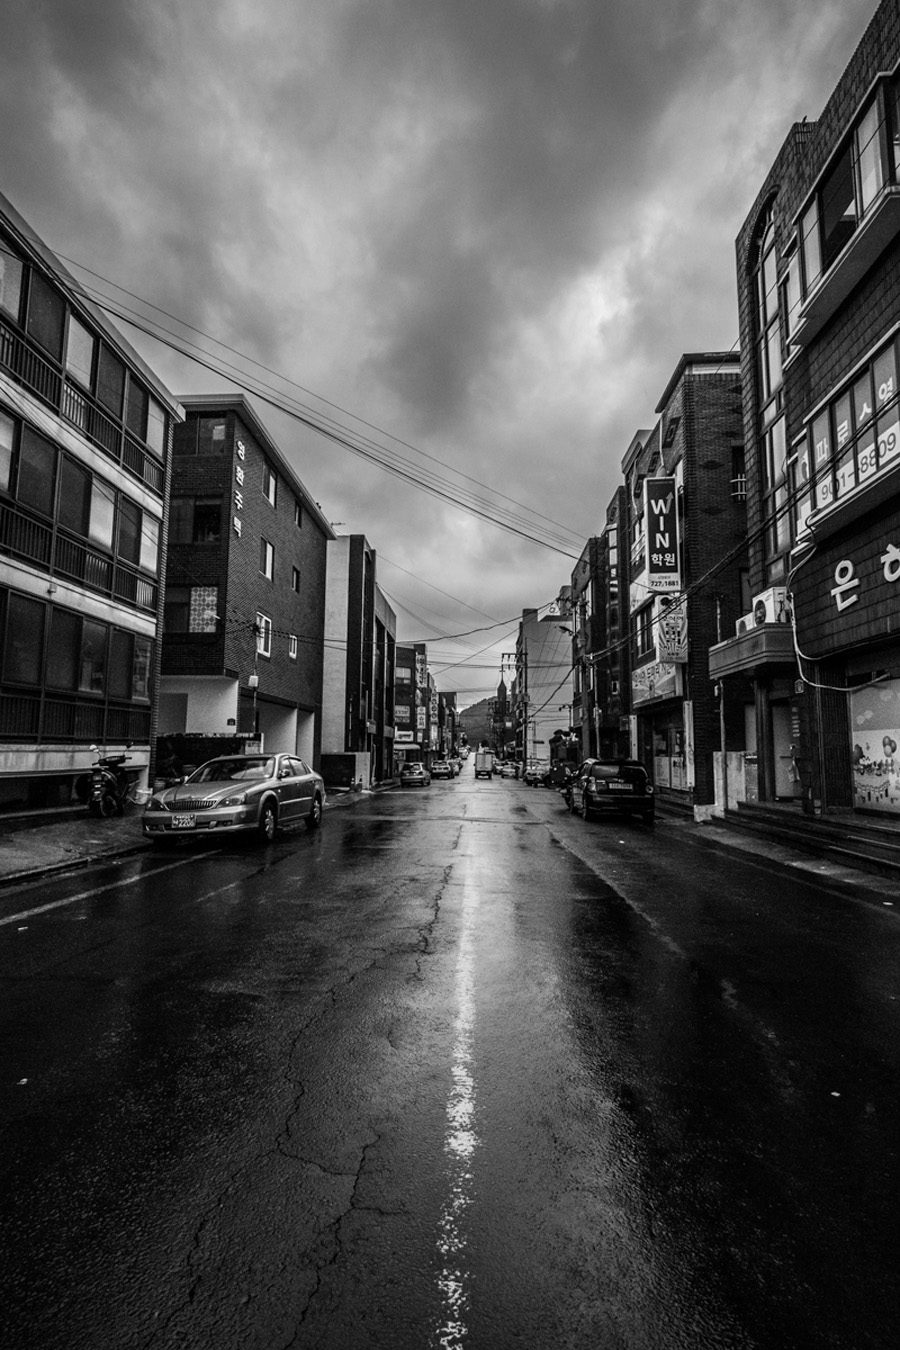
5. Use shadows and similar shapes
I once wanted to bring attention to a group of men standing against a wall. I was in a car, that was as close as I could get, and there was no way to blur the background. So I looked for something to lead the eye, and a row of walking shadows appeared on the wall.
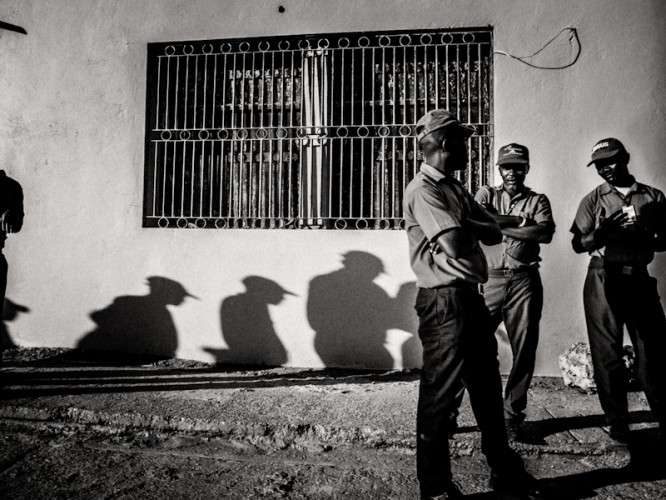
The law of similarity and the law of continuity are both at work in that frame. The shadows repeat the men's shapes, and the brain reads them as one line that ends at the men.
6. Set aperture for depth
If the line starts in the foreground and ends in the background, you want foreground and background sharp. Use f/8 or f/11 for plenty of depth of field from the foreground to the background. A shallow depth of field can also work if the line leads to a sharp subject and fades into blur behind it. My street photography settings guide has the full setup.
7. Don't let lines compete
One strong leading line beats five weak ones. Lines within the frame should work with the other compositional elements, not against them. If lines run in every direction, the eye does not know which to follow. Simplify the frame until one path clearly wins.
Common mistakes with leading lines
- A line to nowhere. A beautiful road with nothing at the end is a postcard, not a street photograph. Wait for the subject.
- Lines that lead out of the frame. The eye exits with them. Reframe so the line turns back in or ends on something.
- Subject off the line. If the subject stands a meter to the side of where the lines point, the frame feels off. Move a step until they line up.
- Tilted verticals by accident. Converging vertical lines from a low angle look intentional. Slightly tilted ones look like a mistake. Go all the way or keep the camera level.
- Relying on lines alone. A strong leading line does not make a picture interesting. It points at something. That something still needs to matter, and it still needs to tell a story.
- Forcing the rule of thirds. If the lines converge in the center, put the subject in the center. The lines matter more than the grid.
Famous photographers known for leading lines
Henri Cartier-Bresson is the classic reference. In his 1932 photograph from Hyères, France, the curve of a spiral staircase and railing leads down to a cyclist blurring past on the street below. He trained as a painter before photography, and geometry runs through his work.
Fan Ho photographed Hong Kong in the 1950s and 1960s with lines of light and shadow cutting across walls and alleys. Approaching Shadow (1954), with a woman beside a wall split by a diagonal shadow, is one of the best known examples.
The Portuguese photographer Jorge Silva, featured in Inspired Eye, put it simply: "I am always searching for leading lines, for elements to strengthen the composition." His advice to readers was to search for lines and the geometry of the place.
I think the best way to learn is to study photographers like these. It is worth more than any list of photography tips. Natural leading lines, like rivers and shorelines, work the same way as painted ones. The experience of looking at a good photograph is the experience of being led. Look at where their lines start and where they end.
How to practice leading lines at home
You do not need a city. Hallways, stairs, the edge of a table, floorboards and window light across a wall all make lines. Put an object where the lines meet and take the picture. Then move the object off the line and compare. You will see how much the line does.
A tripod is not required for street work, but at home it helps you test small changes in position one at a time.
In editing, you can strengthen lines you already have. Brighten a light line slightly or darken the area around it with dodge and burn in Lightroom. Then crop so the line starts in a corner.
Leading lines are one of five laws
This guide to leading lines covers one tool. Lines in images can help to create depth, but they sit inside a bigger idea: the laws that decide where people look in a photograph. In Module 3 of our online street photography course, Phototactic, we teach 5 laws that make people look where you want them to, and continuity is only one of them. We also cover how similarity and proximity combine with lines, like the shadows in the photo above.
For the rest of the toolkit, go back to the photography composition hub. Lines pair well with framing in photography, where a frame holds the eye after the line brings it in, and with negative space, where a single line crosses an empty area. New to the street? Start with street photography for beginners.
Frequently Asked Questions
What are leading lines in photography?
Leading lines are lines in a photograph that guide the viewer's eye toward the main subject. They can be real lines, like roads, rails, fences and shadows, or implied lines, like the direction a person is looking. The brain naturally follows a continuous line, so when the line ends on the subject, the viewer lands there without effort.
What are examples of leading lines?
Common examples are roads, crosswalk stripes, curbs, train tracks, stair railings, fences, rows of trees, building edges, bridges, hallways, long shadows and power lines. Implied lines count too, such as a person's gaze or a pointing arm. In street photography, the most useful ones are lines you can find first and then wait for a person to walk into.
Why do photographers use leading lines?
Leading lines control where the viewer looks and in what order. They make the main subject clear and create a sense of depth by pulling the eye from the foreground to the background. They are especially useful when you cannot blur the background, for example with a wide lens at f/8.
Do leading lines have to be straight?
No. Curved lines and S-curves work well and often feel more natural than straight ones. Diagonal lines add energy, while horizontal lines feel calm. Lines also do not have to be continuous. A row of repeated shapes, like shadows or windows, reads as one line because the brain connects similar shapes.
What lens is best for leading lines?
A wide-angle lens, from about 16mm to 28mm on full frame, makes leading lines longer and more dramatic because it stretches the foreground and exaggerates how lines converge. A 35mm lens works well too. Telephoto lenses compress lines, which suits patterns and repetition more than depth. See our lens guide for street photography picks.
Who is famous for using leading lines?
Henri Cartier-Bresson is the best known example, especially his 1932 Hyères photograph where a spiral staircase leads to a passing cyclist. Fan Ho used lines of light and shadow across Hong Kong streets in the 1950s and 1960s. In landscape photography, roads, rivers, fences and shorelines have been used as leading lines for generations.