
Layering in photography means placing separate subjects at different distances from the camera, so each plane, from the foreground to the background, adds something to the picture. Done well, every layer stays readable and the eye walks from one to the next instead of getting stuck in a pile of overlapping shapes.
I'm Olivier Duong. Before I picked up a camera I trained as a graphic designer, and to me this composition technique is design with depth, a way to create the illusion of three-dimensional space on a flat print. It is also one of the quickest ways out of the flat, "one guy walking past a wall" photo that so many of us shoot for years.
What is layering in photography?
A camera takes a three-dimensional scene and presses it onto a flat rectangle. People who stand meters apart on the street end up side by side in the photograph. That compression is the whole trick. It lets you build relationships between things that had nothing to do with each other a second earlier.
Layering uses that on purpose. You look for a subject close to the lens and another one farther back, and often a third plane in between. Each plane is called a layer, which is why the technique is called layering. The photo gets a sense of depth, and the viewer reads it like a small stage with actors at different distances. Three distinct planes are the classic setup, but two strong ones are plenty.
Photographers also call this figure to ground work: every figure needs a clean patch of ground behind it so the brain can separate it from the rest. A layered frame is several figure to ground relationships stacked in one image.
Layering is not the same thing as a multiple exposure, where two images are combined into one file in camera or in Lightroom. That is a different technique. Layering happens in a single exposure, in the real scene, through where you stand and when you press the shutter.
Why layering helps an image tell a story
One Reddit user put the problem plainly: "I feel I'm lacking originality, and I can't add layers to my photos." Most beginner street photos have one subject on one plane. The picture says one thing and the eye is done in a second.
A layered photograph asks the viewer to travel. The eye lands on the closest face, moves to the gesture in the middle, then finds the small figure at the back. Each stop adds another layer of narrative, and together they tell a story no single subject could convey. That travel time is what makes people look longer. It is the difference between travel photos that look like a record of a trip and street scenes that feel like storytelling.
When I studied Lee Friedlander's pictures for Inspired Eye, what struck me was his controlled chaos. His frames are full of poles, signs, reflections and people, yet nothing feels random. There is a thread holding it all together. That is the job of the street photographer: the chaos is in front of the lens, and order should come out of the camera. Layering is one of the main tools for that. If your photos feel like snapshots, my guide on why street photos look boring covers the other common causes.
How to use layering in street photography, step by step
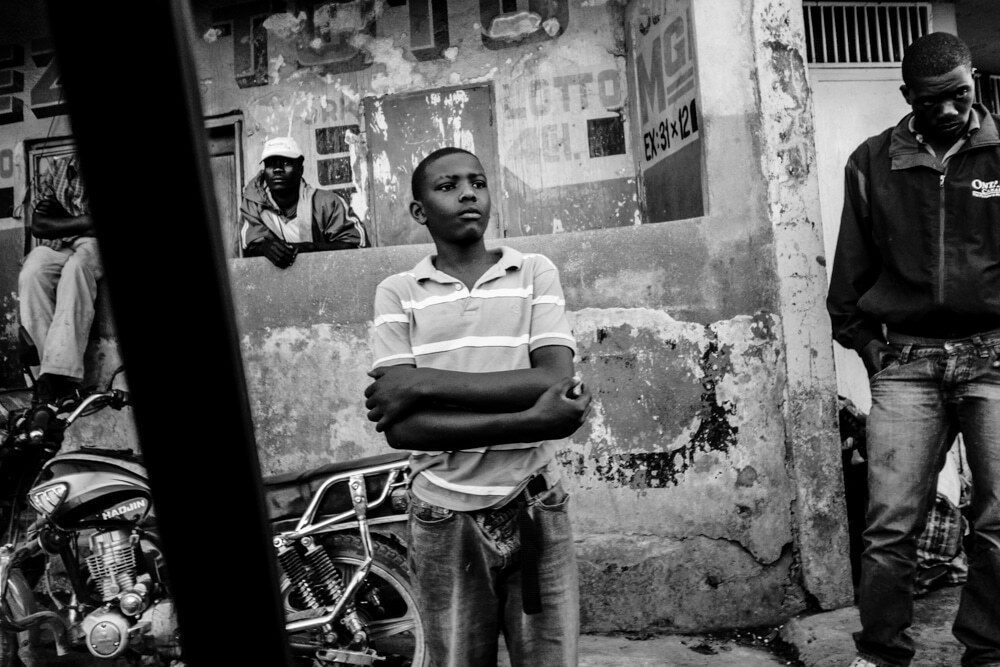
- Start with the background. Pick a place with depth: a market street, a train platform, a crossing, a busy sidewalk. Crowded places help. In the busiest parts of Osaka it was almost hard not to get layered frames, there were so many people.
- Find your middle layer. This is often where the main action happens: a vendor, a group talking, someone waiting, a kid on a scooter. Frame it with space around it.
- Wait for the foreground. Stay put and let someone walk into the near plane. A face or a shoulder close to the lens anchors the frame and gives you scale. This foreground element is the extra layer that adds depth. Patience beats chasing.
- Look for gaps. Each layer needs its own spot in the frame. If a head in the back grows out of a head in the front, move a step left or right, or wait.
- Change your camera position. Crouch or step sideways. A few centimeters decide whether the layers overlap or sit apart. Your feet are your best composition tool.
- Shoot a sequence. Layered scenes change every second. Work the scene with several frames and pick the one where all planes line up.
A line from my old Inspired Eye tips list still holds: "Layer your images, think in terms of 3, foreground, midground, background." Two good layers already beat one. Add the third when the street offers it.
Keep the layers apart: separation is everything
The most common failure is a mess. Too many elements overlap and the viewer can't tell where one person ends and the next begins. More layers do not make a better photo. Readable layers do.
People see broad shapes first and details second. So check your frame for shapes, not faces. Each subject should read as its own clear silhouette against something plainer behind it.
- Tonal separation. Put a dark figure against a light wall, or a lit face against shadow. Your eye goes to the brighter part of the frame, the one with the most contrast. Watch the angle of the light: side light carves planes apart.
- Size separation. A large near subject and a small far one read instantly as different planes. Scale is a strong depth cue.
- Color separation. A red coat in the middle layer pops against a gray crowd. Colour gives each plane its own identity.
- Texture separation. A rough brick wall behind a smooth coat, or a soft sky behind a sharp profile, helps each plane stand apart.
- Gesture separation. Give each layer its own action: one person looks left while another walks. Different verbs keep the planes from blending.
This is where the Gestalt laws help. The law of proximity says the brain groups things that sit close together. If two people from different planes touch in the frame, the brain welds them into one blob. Leave a sliver of space and they read as separate.
Camera, lens and exposure settings for layering
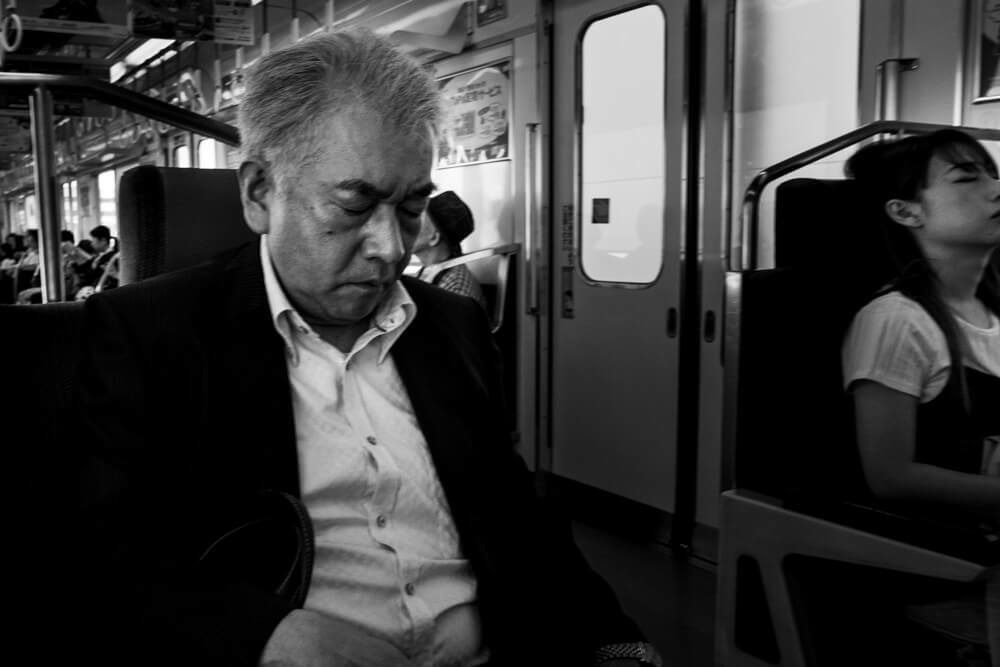
Wide lenses make layering easier. A 28mm or 35mm field of view takes in more of the scene, so you can include a near subject and a far one in the same frame. With a 28mm you can stand close to the foreground person and still see the street behind. That is why so many layered street photos are made with small wide cameras. My guide to the best lens for street photography compares focal lengths.
A 50mm or longer lens flattens the planes. It can still work, but the layers stack tighter and overlap more often.
For depth of field, most street photographers keep every layer sharp. Set f/8 and zone focus at about 2 to 3 meters, with auto ISO keeping the shutter speed fast. My street photography settings page has the numbers. Deep focus lets the viewer read every plane.
Blur is a creative choice too. Saul Leiter often shot through rainy glass or past a blurred shape in the foreground, so the near layer became a soft wash of colour and the main subject sat farther back. A soft foreground element can frame the point of focus. Some photographers push this further with a Lensbaby or a long exposure with a neutral density filter, so moving people blur into one layer while a still subject stays sharp. Just make it a choice, not an accident.
Layering examples: photographers and painters to study
Studying layered photographs is the fastest way to train your eye. A few names worth a long look:
- Alex Webb. Dense, saturated frames where several people and shadows share the picture, each in its own pocket. His book The Suffering of Light is a master class in layered color.
- Saul Leiter. Layers of glass, reflections and blur in New York, often with the main subject tucked into a corner.
- Lee Friedlander. Poles, signs, mirrors and his own shadow stacked into one frame. Reflections let him bring two worlds together in a single image.
- Sergio Larrain. Dreamlike, layered frames from Valparaíso, with children and stairways at several depths.
Painters solved this long before cameras. Leonardo da Vinci and Raphael built depth with overlapping planes and haze toward the horizon. Chinese shan shui painting stacks mountains in receding bands. Landscape photographers use the same idea with ridge lines fading into atmospheric haze, where distant objects turn paler with each plane. In documentary work, layering lets one image hold a whole situation. The principle does not care about genre or subject matter.
For more on how these ideas fit together, see my photography composition guide.
When not to layer
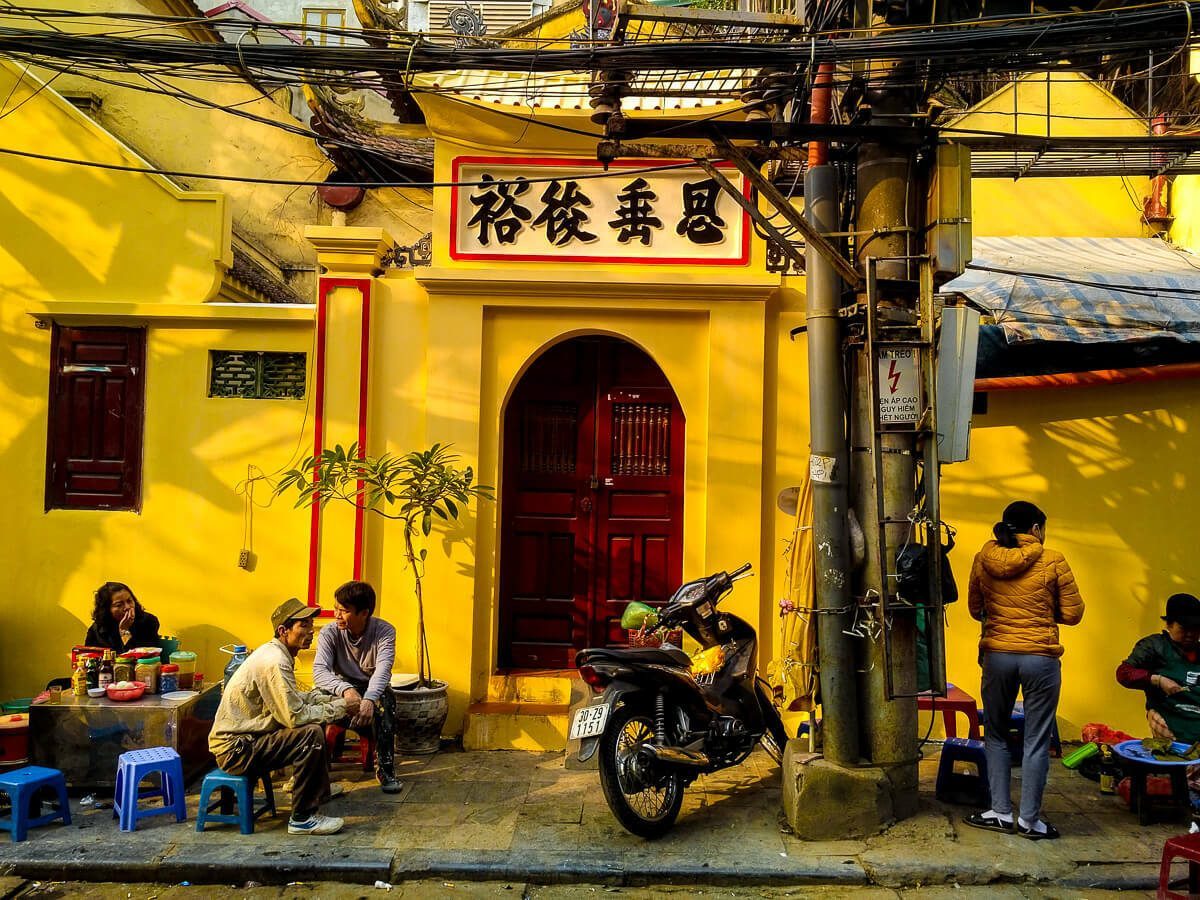
Layering is a tool, not a rule. In Hanoi, the sidewalks are so narrow that people live against long yellow walls. I crossed the street, turned around, and made flat images where everything sits on one layer, like actors on a stage. The flatness is the point.
If a scene has one strong subject, adding more layers can dilute it. Sometimes the better move is the opposite: clear the frame and use negative space. Other times a doorway will do more than extra people, which is where framing comes in. And when two layers argue with each other, you may have a juxtaposition on your hands.
A layering exercise for your next walk
Pick one busy spot and stay there for 30 minutes. Consciously shoot only frames with at least two layers within the frame, and look for an interesting subject in each one. Before each shot, ask yourself: can I count the layers, and does each one add to the story the image tells?
Then look at your results on a big screen. Mark each frame where two planes merge. You will start seeing merges before you press the shutter within a few outings. That is how you learn to see in depth, and it is a picture pattern forming in your head.
That idea sits at the heart of my online street photography course, Phototactic. Module 3 covers the 5 laws, 6 elements and 8 arrangement principles that make frames like these read cleanly, with a cheat sheet to carry on the street. It is short videos you watch on your own. There is no critique of your own photos, so the practice is on you.
Frequently Asked Questions
What is layering in photography?
Layering is a composition technique where you place subjects at different distances from the camera, usually one near the lens and one farther back, with a middle ground when the scene allows. Each plane adds part of the story. The result is a sense of depth in a flat image, as long as each layer stays separate and readable.
How do you layer your photos?
Pick a scene with depth, like a busy street. Find your middle layer first, then wait for someone to enter the foreground. Move your feet until each subject has its own space in the frame, and shoot several frames. A wide lens at f/8 keeps every layer sharp.
What is it called when you layer pictures on top of each other?
Combining two pictures into one file is called a multiple exposure, or compositing when done in editing software. Layering in composition is different. It happens in a single exposure, by arranging real subjects at different distances from the camera so they overlap in depth without merging.
What lens is best for layering in street photography?
A 28mm or 35mm equivalent lens is best for most people. It is wide enough to include a close foreground subject and a far background in one frame. Longer lenses compress the planes, so the layers overlap more often and are harder to separate.
Is layering the same as depth of field?
No. Depth of field is how much of the scene looks sharp. Layering is about placing subjects at different distances. You can layer with deep focus so every plane is sharp, or with a shallow depth of field so one layer blurs into a soft frame around the point of focus.