
To make a photo essay, pick one subject you can return to, shoot it many times, then sequence 10 to 20 frames with a strong opener and a strong closer. The subject gives you the story. The sequence is what makes it read as an essay instead of a pile of pictures.
I'm Olivier Duong. For years I edited and sequenced the work of other photographers for Inspired Eye, the magazine I ran with Don Springer. Most issues meant taking about 20 images from each photographer and turning them into a coherent whole. This page is the method I used, plus how to shoot the essay in the first place.
What is a photo essay?
A photo essay (also written photo-essay) is a series of photographs arranged to tell the story of one subject or explore one idea. Like a written essay, it has an opening and an ending. Each image adds new information. Together they say something no single photograph could.
The form grew up in picture magazines. Life magazine made it famous in the middle of the 20th century, and newspapers such as The New York Times still publish photo essays online. It is one of the oldest forms of visual storytelling, with a tradition rooted in reporting and documentation.
There are two broad kinds:
- Narrative photo essay: follows events in order, like a day in the life of one person or the build-up to a festival.
- Thematic photo essay: gathers images around one idea, like loneliness in a big city or the way people wait for buses.
Street photographers usually make the second kind, with any camera they happen to carry. You rarely get to follow a story from start to finish on the street. You can collect a theme for years.
Street photography vs the photo essay
Here is how I split them. Street photography is concerned with the instant. Documentary photography is concerned with the sequence. In street you chase the one frame. In a photo essay you care about how a series of photographs tells a story.
That's why I have always thought of myself more as a documentary photographer who works in the streets. One picture can hold a story inside it. But the point of an essay is the story told across images, and that changes how you shoot. You stop looking only for the killer frame and start looking for the frames that connect and convey something together.
The good news: your street photos are raw material for an essay. Most of us already have a theme hiding in our archive. We just haven't edited it yet.
Photo essay examples worth studying
You learn sequencing fastest by looking at essays that work, and they are a great source of inspiration before you take pictures of your own. These are well documented and easy to find in books or museum collections.
- W. Eugene Smith, "Country Doctor" (Life, 1948). Smith followed Dr. Ernest Ceriani in rural Kremmling, Colorado. It's one of my favorite essays. Smith said his main influences were theater and music, and you can feel it: the images play like scenes in a play.
- Gordon Parks, "Flavio" (Life, 1961). Parks photographed a sick boy and his family in a favela in Rio de Janeiro. The essay moved readers to raise money for Flavio's treatment.
- Robert Frank, The Americans (1958 in France, 1959 in the United States). A book of 83 photographs from road trips across the country. There's no plot. The sequence carries the mood from one picture to the next.
- Bruce Davidson, East 100th Street (1970). Two years on one block in East Harlem, New York City. It proves you don't need to travel for a strong essay. You need to go back.
- Jill Freedman, Firehouse (1977) and Street Cops (1981). Freedman spent long stretches with firefighters and police officers in New York. Access came from time spent with her subject.
Notice what they share: one subject, visited again and again, then edited hard.
How to make a photo essay, step by step
1. Pick a subject you can return to
The best essay subject is close to home. A street corner, a market, your neighborhood, a community you belong to. Travel is fun, but novelty wears off, and you can't go back next week to get the frame you missed. Limiting your location also trains your eye. You start to expect how the shadows fall on that building at 5pm.
Photo series ideas that work on the street: the same bus stop across a year, people at one park or community center, hands at a market, changes in your neighborhood, night workers, or a single color you keep seeing. More in street photography ideas.
2. Write one sentence about what it's about
Your intent is the filter for every later decision. It decides what you capture and what you leave out. "The market" is a location. "How the market wakes up before the city does" is an essay. Keep the sentence loose. It will change as you shoot.
3. Shoot it many times
One outing is a set of pictures. Ten outings is the start of an essay. Go at different times of day and in different weather. Change your angle and your lens distance so the essay doesn't look like one long album of the same shot. Shoot wide scenes, medium shots, close details and portraits. Interaction between people is gold, because it gives the viewer a relationship to read.
4. Shoot the pictures an editor needs
Editors look for a few kinds of image in any essay:
- An establishing shot: a wide view that tells the viewer where we are.
- Portraits: faces the viewer can connect to.
- Interactions: two or more people doing something together.
- Details: hands, objects, textures that carry meaning.
- A closer: an image that feels like an ending, or an open question.
You won't get these on purpose every time. But if you know the list, you'll recognise them when they happen.
How to edit a photo essay
Editing is choosing. Sequencing is ordering. Both matter because of selective exposure: the viewer judges you only on the images you show. After my edits, some photographers looked much better than their full archive would suggest. You can do the same for yourself.
Start with beginning, middle and end
On a first pass I look for the strongest images in the bunch. Then I pick three and label them B, M and E: beginning, middle and end. I cycle through two or three more times to make sure they deserve it.
- Beginning: it has to grab attention and tell the viewer there's good stuff inside.
- Middle: attention drops halfway through any selection. A strong middle image re-energises the viewer.
- End: people judge an experience by how it ends. That's recency bias. Your last frame stays with them.
A common rule of thumb is a selection of about 12 images. If you have room for more, add more "middles". The bigger the tent, the more poles it needs.
Remove images that are too similar
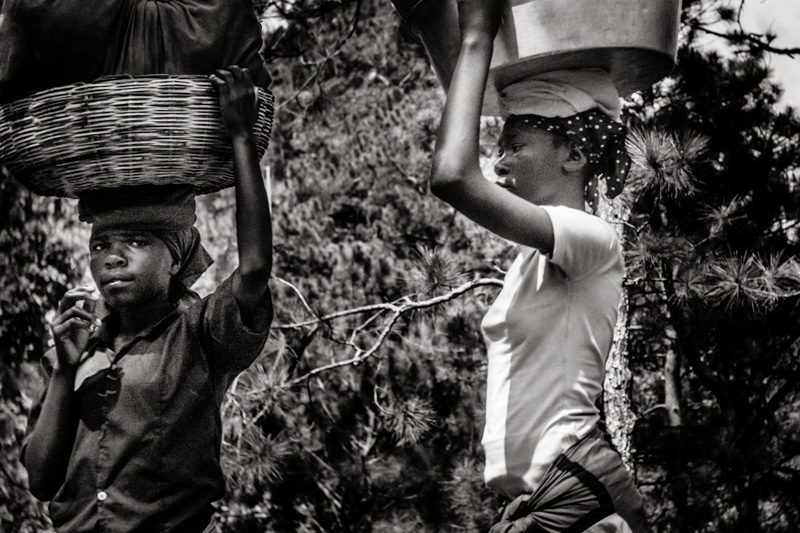
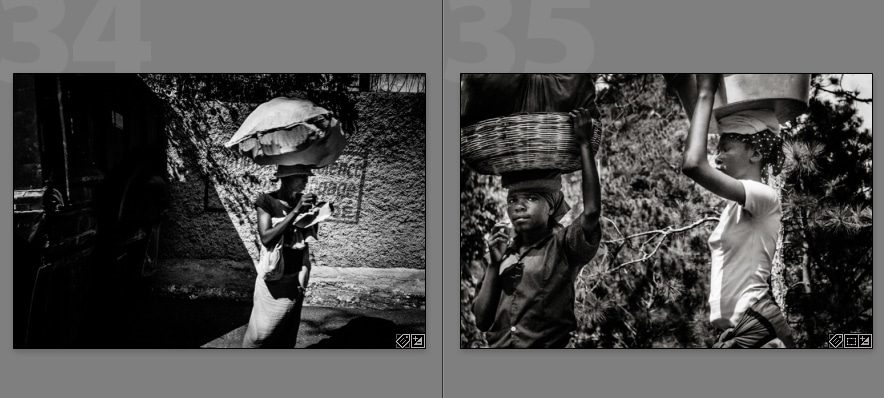
Two frames that say the same thing weaken each other. Keep the one that fits your intent. If I wanted to show Haitians as brave, I'd keep one frame. If I wanted a heavier mood, I'd keep the other. Both were good. Only one served the essay.
Get a second pair of eyes
It is easier to edit someone else's work than your own. You know the story behind every frame: the hour you waited, the climb to get there. The viewer doesn't. I'm from Haiti, so people carrying loads on their heads looked normal to me. A friend saw it with fresh eyes and told me the photo above was more interesting than I thought. When I send out an edit, about 80% of the choices are my own. The rest come from an outside view.
How to sequence photographs
Sequencing photographs is where most essays fall apart. One photographer on Reddit put it well: "It never feels quite right to me." Here's the process that fixed it for me.
Set the scene right after the opener
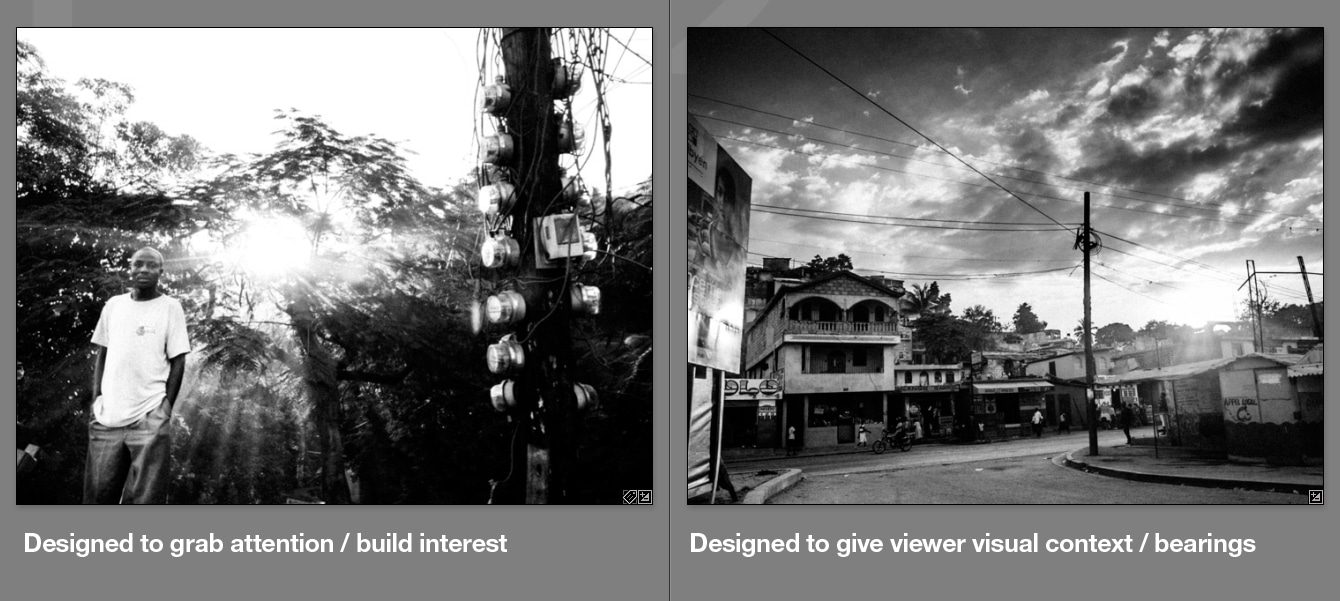
You know where you live. The viewer has no idea. So right after the opening image, I place a scene setter: a wider shot that gives context and bearings. The jump from opener to scene setter can feel abrupt. That's fine. It orients the viewer for everything that follows.
Find the links between images
Look at every frame as thumbnails and break each one down into what it's made of. The brain is wired to find patterns, so threads start to appear. These are the links I use:
- Location: a man sleeping on the sand next to a shot of the beach.
- Time: the same street by day, then by night.
- Number: one person carrying a load, then two. A crescendo, or the reverse.
- Visual weight: subjects getting bigger in the frame from one image to the next.
- Orientation: verticals grouped with verticals.
- Color: similar palettes together. I often follow the color wheel.
- Theme: umbrellas with umbrellas. If I only have one cat, I pair it with a dog, because both are animals.
- Processing: the same editing style side by side.
- Composition: the same perspective or the same figure-in-landscape layout.
Some links are stronger than others. A photo of a cat with its ball has a strong "cat" value. A portrait with a cat in the background has a strong "portrait" value. Pair each image by its strongest link first.
Use transition images
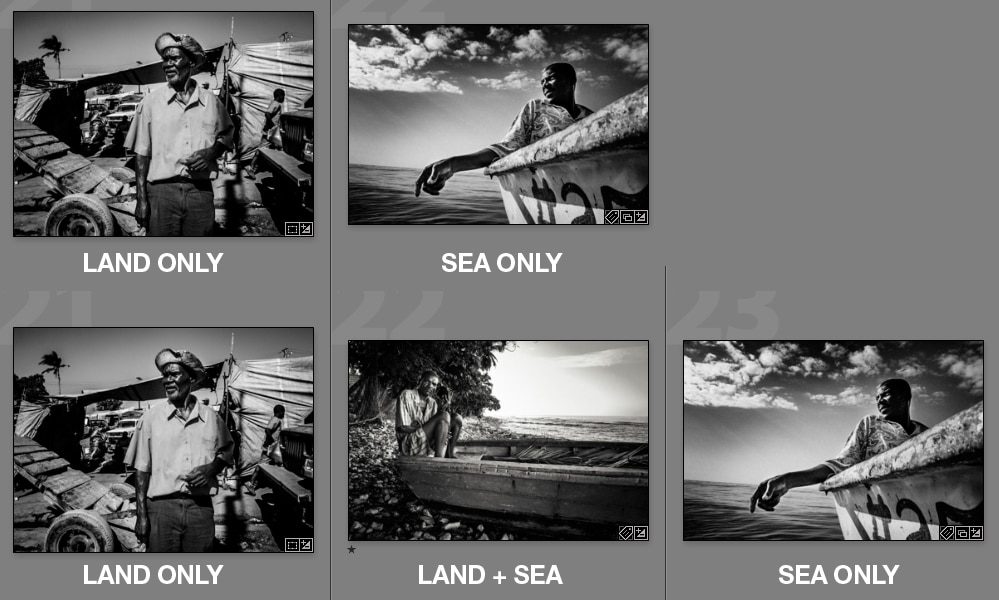
Think like a filmmaker. You can't cut from Los Angeles to China without a shot of a plane. When I had to move from images on land to images on a small boat, I put a frame with both land and boat between them.
Break the rules when the story needs it
I usually put like with like. But once I sequenced a soldier's life for the magazine, and his life jumped between hard and soft: the army on one page, his kids on the next. So I made the images clash on purpose. A military vehicle in the sand, then his daughter in her toy car. The abrupt cut was the story.
End on an open question
I like to end on an ambiguous image, often one with open sky or space, sometimes almost abstract. It denies the brain closure. An open loop keeps the viewer thinking after the last frame.
Drop what doesn't fit
Some good images won't fit. Keep them somewhere safe. They may start your next essay.
Captions and text
Words matter too. When I edited the magazine, the photographers who wrote well about their work were more interesting, even when their images were average. You don't need a long text. A short introduction and a caption per image are enough for most essays.
Good captions add what the photo can't depict or illustrate on its own: a name, a place, a date, what happened just before. Bad captions describe what we can already see. Interviewing people you photograph gives you better captions and often better access.
Where to publish your photo essay
A photo essay can live on a website, in a zine, in a slideshow or on a wall. Print makes you edit harder, because every page costs money. A small stapled zine of 12 to 24 pages is a good first format.
Before you publish, check your hit rate honestly. Most photographers keep far fewer frames than they expect, and that's normal. If the essay reads flat, the problem is usually the edit, not the photos. For the basics of judging single frames, read what makes a good photograph.
If you want the full method, our online street photography course includes a recorded shooting demonstration where I cull my own images and explain the science behind sequencing them. It won't review your essay for you. There is no feedback on student photos. It shows you how I think so you can do it yourself. New to all of this? Start with street photography for beginners.
Frequently Asked Questions
How many photos should be in a photo essay?
Most photo essays use between 10 and 20 photos. A tight selection of about 12 is a common rule of thumb for magazines. Fewer strong images beat more average ones. If you have room for more, add strong middle images to keep attention up, and remove any frame that repeats what another already says.
What is the difference between a photo essay and a photo series?
A photo series groups images that share a style or subject, and the order often doesn't matter. A photo essay tells a story or builds an argument, so the order matters. It has an opener and a closer, and each image adds something new. Every photo essay is a series, but not every series is an essay.
What is a famous photo essay?
W. Eugene Smith's "Country Doctor", published in Life magazine in 1948, is one of the most famous. Smith followed a rural doctor in Kremmling, Colorado. Other well known examples include Gordon Parks's "Flavio" for Life in 1961 and Bruce Davidson's East 100th Street, made on one block in East Harlem.
What is another term for a photo essay?
A photo essay is also called a photographic essay, a picture story or a photo story. In documentary photography and photojournalism you'll also hear "photo story" or "feature". Some photographers use "body of work" or "project" for longer essays shown as books or exhibitions.
Can a photo essay be made from street photography?
Yes. Street photography suits the thematic photo essay: images gathered around one idea, place or pattern over months or years. Pick one location or theme, keep returning, then edit and sequence your frames so each one adds something. Many classic street photography books work as long photo essays.